 |
|
|
| GeneratorServicesUtil::crossProductGen |
| ProbeUtil::getMaximumProbePoints |
| ProbeUtil::probeSmallBox |
| PillarFinder |
| PillarReader |
| Sample Run |
Problem Overview
This tutorial is built around a scenario commonly required in research, i.e., using distributed computing to search vast amounts of data for patterns of interest. In our case the data are defined as a surface with embedded pillars. Each pillar has a plaque on top with some text on it. The surface is defined by a set of points (x,y) with a height (h) defined for each point.
Surface data are accessible via a web service interface. To get the height of the surface at a given point, we send the service the (x,y) coordinates and receive the height (h) as a result. To find the patterns, a large number of points will need to be probed.
Because we will be running a large number of probes and receiving many results, we will also include a storage mechanism. We will store our query sets and result sets in files, and we will use a web service interface for storing and retrieving the files. This activity will also be authenticated.
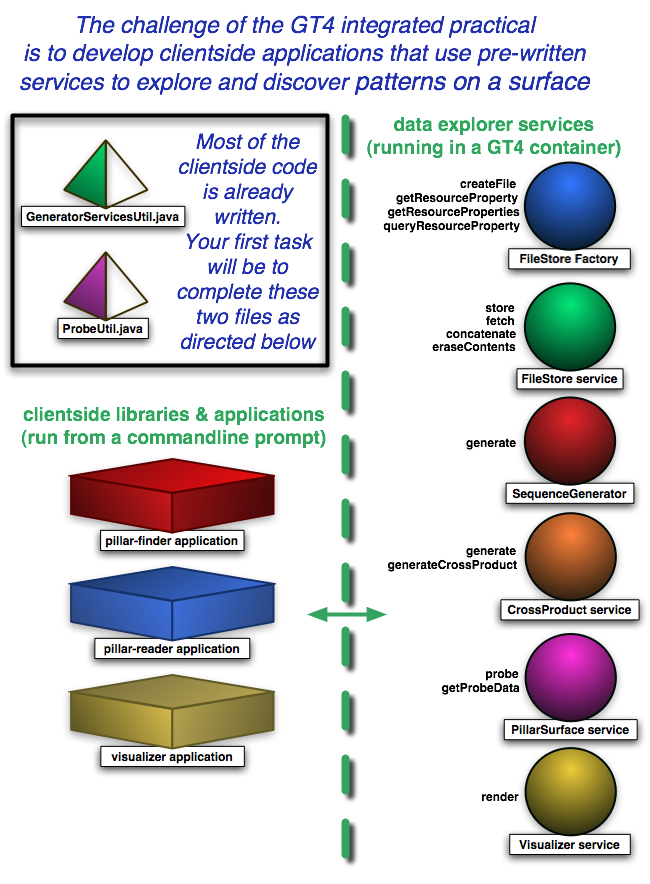
Pillar Data Explorer Services
The following services have been created by the instructors for use in this exercise. You will not need to edit them:
- The FileStore Factory and FileStore service can be used to store data files with query points (for input to the surface service) and data files with the surface data (as output from the surface service).
- The SequenceGenerator service generate sequences of numbers within a given range.
- The CrossProduct (XProduct) service takes two arrays of numbers [x1...xn] and [y1...yn] and generates all possible (x_i,y_j) pairs of points from those numbers.
- The PillarSurface service exposes the pillar surface, specifically height data.
- The Visualizer service can be used visualize the pillar surface probe data. It returns a GNU Plot of the points and can help identify the location of the plaque.
Client-side Applications
To help locate the pillars on the surface, an application called "pillar-finder" has been provided. The pillar-finder takes in the search area as parameter and attempts to probe numerous points in the area and determine if a pillar exists with in the area.
Another application called "pillar-reader" has been provided to read the text on the plaque on the pillar. This application takes the pillar location found by the pillar finder as input and attempts to read the text on the pillar.
Also, a visualizer application has been provided to help generate a graph of the probed area. The result of this application is a plot of the area. From the plot you can try to reduce the search area to use for the pillar-finder to accurately find the pillar. Using this client is optional.
Your job!
The applications mentioned above use various utility classes. All the utility classes from the advanced tutorial will be reused here. Don't worry if you didn't finish the GT4 advanced practical because the solution will be provided to you. But there are two new utility classes that you need to complete before the Integrating applications will work correctly. Your first task is to fill in the code missing in the two util classes, then try to find a pillar, read the text on top of it, and then search for the next pillar, etc.
Similar to the advanced practical, the code you are to write consists of clientside service invocations. It is perhaps of interest to note that when the code is complete the applications will be acting in the role of web service clients.
Service invocations in GT4 follow a predictable pattern:
- construct a URL or retrieve an EPR to the service
- get a port type using addressing locators
- construct the message to be sent to the service
- invoke the operation
You can refer to the advanced practical solutions in
/gt4/$USER/gt4-ip-client/ws-clients/src/org/globus/tutorial/client/ (search for the word ADD) for samples of this pattern.
You will need to start up your own local server using the Globus Toolkit distribution provided. This distribution includes Java WS Core and the services that are needed for the integrating practical.
You will use two command windows in this tutorial. One that runs your server and other to deploy and run client.
This color is used to indicate the server window.
This color is used to indicate your client window.
1. Installation Steps
In this section you will find instructions to set up the GT installation and tutorial code.
-
Download the Globus Toolkit distribution and untar it in /gt4/$USER/gt4-ip-install
$ mkdir -p /gt4/$USER
$ cd /gt4/$USER
$ wget http://www.gs.unina.it/~gt4/integrated/gt4-ip-install.tar.gz
$ tar xvfz gt4-ip-install.tar.gz -
Set GLOBUS_LOCATION to point to your install.
$ export GLOBUS_LOCATION=/gt4/$USER/gt4-ip-install
- In a new window, which will henceforth be the client window, set GLOBUS_LOCATION to point to that directory.
$ export GLOBUS_LOCATION=/gt4/$USER/gt4-ip-install
Create a directory to download client applications.
$ mkdir /gt4/$USER/gt4-ip-client
-
Download client-side application (which is partially completed)
$ cd /gt4/$USER/gt4-ip-client
$ wget http://www.gs.unina.it/~gt4/integrated/gt4-ip-practical.tar.gz
$ tar xvzf gt4-ip-practical.tar.gz
The utility files built in the Advanced Practical will be used in this practical, so download the Advanced Practical solution and untar it.
$ cd /gt4/$USER/gt4-ip-client/ws-clients/src/org/globus/tutorial
$ wget http://www.gs.unina.it/~gt4/advanced/gt4-ap-solution.tar.gz
$ tar xvzf gt4-ap-solution.tar.gz
The code that you need to complete for this practical lives in /gt4/$USER/gt4-ip-client/ws-clients/src/org/globus/tutorial/pillarClient. Refer to next section on how to fill the code.
2. GeneratorServicesUtil.java
For this practical you will need to modify two files. The first file to modify is:
/gt4/$USER/gt4-ip-client/ws-clients/src/org/globus/tutorial/pillarClient/GeneratorServicesUtil.java
The astute student will see that the class in this file extends from the GeneratorServicesUtil class in the Advanced Practical.
Note! Throughout this practical it will be helpful to remember that the
ws-clients/src/org/globus/tutorial/client/ directory contains the completed solution from the Advanced practical, and the
ws-clients/src/org/globus/tutorial/pillarClient/ directory contains the clientside files that need to be completed for the Integrated practical.
2.1 GeneratorServicesUtil::crossProductGen
Your first task is to write the client code that invokes the generateCrossProduct operation of the CrossProduct service. The file you need to edit is pillarClient/GeneratorServicesUtil.java. Look at the solution for the Advanced practical (client/GeneratorServicesUtil.java) for hints on how you should finish pillarClient/GeneratorServicesUtil.java
Design details: CrossProduct::generateCrossProduct creates a collection of X,Y coordinates to use as a sample for probing surfaces. Behind the scenes, CrossProduct::generateCrossProduct contacts the Sequence Generator service to generate two sequence of numbers and then does a cross product of the numbers and writes to a file. This is a reduction of the number of round trips from the client by two (as compared to the Advanced practical), since the client does not call the Sequence Generator services directly.
Constructing service URLs (ADD 1)
First we need an endpoint for the XProdService to be able to contact the service. You should use the hostPort passed as parameter to this method and the path to the Cross Prodcut service ("/wsrf/services/XprodService") to construct the URL to the service. When you have a string containing the url, create an URL object with:
URL myUrl = new URL(string);
Your code should go in the section after comment (ADD1).
Port Types and Locators (ADD 2)
Now that we have a URL for the service, we can construct an AddressingLocator (section 5.2.1.1.2) to send our message. There is a different AddressingLocator class for each of our services. Because we are going to talk to the Cross Product Service (XProdService), we will use a XProdServiceAddressingLocator. This is an automatically generated class for which you can find Java Docs here.
Create a new instance of XProdServiceAddressingLocator. Then by invoking the getXprodServicePort() method on the addressing locator, with the constructed URL as parameter, we can create a XprodService object.
Place above code after comment (ADD 2)
Creating input messages (ADD 3)
Okay, now we have an address to talk to, but we need to know what to send it. The key to this puzzle is in the service's WSDL file. We are going to be accessing the generateCrossProduct method, which is described by the following WSDL in $GLOBUS_LOCATION/share/schema/xprod/xprod_port_type.wsdl:
    <operation name="generateCrossProduct">
      <input name="generateReq" message="tns:generateCrossProdReq"/>
      <output name="generateResponse"
            message="tns:generateCrossProdResponse"/>
      <fault name="XprodGeneratorException"
            message="tns:XprodGeneratorException"/>
   </operation>
The input message for that method is described by the following XSD type defined in the same file:
      <element name="crossRequest">
        <complexType>
          <sequence>
            <xsd:element name="start1" type="xsd:double"/>
            <xsd:element name="step1" type="xsd:double"/>
            <xsd:element name="limit1" type="xsd:double"/>
            <xsd:element name="start2" type="xsd:double"/>
            <xsd:element name="step2" type="xsd:double"/>
            <xsd:element name="limit2" type="xsd:double"/>
            <element name="outputFile" type="wsa:EndpointReferenceType"/>
          </sequence>
        </complexType>
      </element>
So what does all of that mean? It means that we need to construct a Java object that corresponds to that input message and send it to the PortType we just created. Fortunately, the WSDL has already been automatically converted into a java type for us during the build process. You can find Java docs for the stub here.
This method need to generate two sequences, so it needs a start, step and limit parameter for each sequence. It then needs an output file to write the generated corss product. All the above are passed as parameter to this method, we just need to put it in a format we can send it to the service.
First we can create an empty CrossRequest object, then use the setter methods(setStart1, setStep1, . . . ) to set the values to the inputs we got in the crossProductGen method.
Note: Ensure that the setter methods set the correct parameters passed to this method.
Place this code after comment (ADD 3)
Invoking a method (ADD 4)
Now you can invoke the generateCrossProduct method on the XprodService object you generated earlier using the message you constructed as input.
Place this code after (ADD 4) comment
The results will automatically be stored in the file located at the EPR that was passed as input. So there is no return value for this method.
Now make sure your code compiles cleanly. Remember to ant clean in between rebuilds:
$ export GLOBUS_LOCATION=/gt4/$USER/gt4-ip-install

$ cd /gt4/$USER/gt4-ip-client/ws-clients
$ ant clean
$ ant deploy
3. ProbeUtil
At this point you have one more file to edit. The file you need to modify is:
/gt4/$USER/gt4-ip-client/ws-clients/src/org/globus/tutorial/pillarClient/ProbeUtil.java
The ProbeUtil utility class is used by the PillarFinder and PillarReader applications to probe surfaces. Because surfaces are represented as resources in the PillarSurface service, ProbeUtil must invoke operations on the PillarSurface service in order to probe surfaces.
Your job is to finish the code in pillarClient/ProbeUtil.java identified by ADD tags in the comments.
Note! Sample client files to help you figure out how to edit ProbeUtil.java can be retrieved by
wget http://www.gs.unina.it/~gt4/integrated/gt4-ip-sample.tar.gz
3.1 ProbeUtil::getMaximumProbePoints
The surface service restricts the number of points that can be probed in one invocation. This value is stored as a Resource Property of the service . For the client application needs to know how many points it can probe in one invocation, we need to fill out the code to invoke the getMaximumProbePoints method.
Resource Property Names (ADD 1)
We want to query the probe service to find the value of the resource property. To do that, we need to know the Qualified Name (QName) of the resource property, which basically is how Resource Properties named.
In this example we are going to query the Pillar Surface Service, so we need to look at the WSDL ($GLOBUS_LOCATION/share/schema/surface/surface_port_type.wsdl) that defines its Resource Properties (RPs):<element name="RPSet"> <complexType> <sequence> <element name="maxSampleSize" type="int"/> <element name="boundBox" type="tns:Box"/> </sequence> </complexType> </element>We also need to know the namespace where this is defined to make the QName. In the <types> section of the WSDL, you see the <schema> element which has a targetNamespace "http://tutorial.globus.org/surface". So we can create a Java QName object using the (string NameSpace, string RPName) constructor using the "http://tutorial.globus.org/surface" namespace and the "maxSampleSize" resource property.
Place this code after (ADD 1) comemnt.
Addressing Locators
Much like the last exercise, we are going to construct a URL from the "hostPort" and Pillar Surface Service Name (declared as constant PILLAR_SERVICE)
We then use that URL to create a GetResourceProperty Port object from a WSResourcePropertiesServiceAddressingLocator.
Why are we using a WSResourcePropertiesServiceAddressingLocator when we are going to be communicating with Pillar Surface Service? If you look at the WSDL of the Pillar Surface Service ($GLOBUS_LOCATION/share/schema/surface/surface_port_type.wsdl), you will find the answer:
<import namespace=
  "http://docs.oasis-open.org/wsrf/2004/06/
   wsrf-WS-ResourceProperties-1.2-draft-01.wsdl"
   location="../wsrf/properties/WS-ResourceProperties.wsdl" />
In turn, the WS-ResourceProperties.wsdl defines the getResourceProperty method we are invoking with the QName.
So, construct a new instance WSResourcePropertiesServiceAddressingLocator, and using the getGetResourcePropertyPort method with constructed URL as parameter, get an object of GetResourceProperty class. You can find javadocs for the method at GT4 online javadocs.
Add this code after the (ADD 3) comemnt.
Invoking the method
Finally, call the getResourceProperty method on the GetResourceProperty port type,and store the result in response object declared. Add this code after comment (ADD 4)
We know that the type of the maxSampleSize Resource Property is an Integer, so code is provided to deserialize the response into a Java Integer object.
Now you need to compile the client code,
$ export GLOBUS_LOCATION=/gt4/$USER/gt4-ip-install

$ cd /gt4/$USER/gt4-ip-client/ws-clients
$ ant clean
$ ant deploy
3.2 ProbeUtil::probeSmallBox
This is the method that is used to probe the Pillar Service and is used by rhe ProbeUtil::probe() method. The ProbeUtil::probe() method will use the maximum number of points from the last exercise to take a large probe and split it into a number of smaller probes. We need to add the logic for conducting the small probes.
This method in turn invokes probeSmallInit and we will need to add code to both these methods.
Constructing service URLs
The Pillar Surface Service can be contacted using a URL. We are passed a hostPort parameter, and can append the PILLAR_SERVICE constant obtain the URL to the service. Add this code to the (ADD 5) section.
Locators and Port Types
Now to get a port tyep object, we need to create a new SurfaceServiceAddressingLocator. The Java docs for the relvalent stub is located at SurfaceServiceAddressingLocator
Pass the URL to the getProbePort() method to get a Probe object. Put this code after (ADD 6) comment.
Input Messages and Methods
This code is placed after comment (ADD 7).
We will use the getProbeData method, which takes an EPR to the output of the XprodService as input to get the results of the probe. The results are not stored in a file in this case, but returned to the client. This is done so that applications like pillar-finder can analyze the data to search for pillars.
You can find the stubs for the Probe object at Probe.java
The method GeneratorServicesUtil.crossProductGen you completed in the previous step is used to get the cross product of two sequences. The cross product generated is stored in a file with EPR stored in variable xprodRef. Pass that xprodRef to the getProbeData of the Probe object.
Store the resulting Data object in the predefined variable "returnedData".
Now you need to compile the client code,
$ export GLOBUS_LOCATION=/gt4/$USER/gt4-ip-install

$ cd /gt4/$USER/gt4-ip-client/ws-clients
$ ant clean
$ ant deploy
4. Search For Knowledge
Now the client code is complete you can run the client applications to search for the pillars. You can use the gt4-pillar-finder to find the location of pillars and gt4-pillar-reader client to read the text on top of the pillar.
Creating Proxy Credentials
A proxy credential is required to run the client. To generate a proxy certificate on the machine, run the following on the server machine.
$ export GLOBUS_LOCATION=/gt4/$USER/gt4-ip-install
$ grid-proxy-init
Starting up local server
For today's exercise you will host the instructor-provided services on your local machine. The services have already been deployed into the GT distribution you installed in step 1.1. By starting the globus container you will automatically start the data explorer services. When you run the gt4-pillar applications (with the host/port of the container hosting the services as a parameter) they will be interacting with the services running inside the globus container.
Note that in a non-tutorial setting there would likely be one container hosting these services for an entire virtual organization. The application code would have no problem accessing the services, even if they were hosted remotely.
To start up services use the following command. (Remember you can replace the port number 9090 shown in sample with any port number of your choice).
$ bin/globus-start-container -nosec -p 9090
Pillar Finder
The methods you wrote in the previous section are used by the PillarFinder class to find pillars. This class searches for pillars in a circular area using the center and radius provided as parameters. The A wrapper script called gt4-pillar-finder has been written to conveniently use the pillar finder..
bin/gt4-pillar-finder cx cy radius step samples hostPort e.g. PillarFinder -8920 -9909 3.0 0.15 1000 localhos:8080- cx :The x coordinate of the center point to search.
- cy :The y coordinate of the center point to search.
- radius :The radius of the search.
- step :The step size to use within the search area.
- samples :Number of sample points.
- host:Port :Host and port of the service to contact in the format localhost:9090
Pillar Reader
The methods you wrote in the prevous section are used by the PillarReader class to read the data on top of a pillar. A wrapper script gt4-pillar-reader was built to run the client easily. The output of PillarFinder is used as PillarReader parameters.
The program takes the lower and upper coordinates of the pillar, a step size that determines how points are generated to search the area of pillar for plaque and a file to write the text on the plauqe.
$ bin/gt4-pillar-reader
Usage: PillarReader
e.g. PillarReader -8920 -9909 -8902 -9907 0.15 temp localhost:8080 - x1, y1 :lower coordinate of search area (from pillar finder)
- y2, y2 :upper coordinate of search area (from pillar finder)
- sample_distance :determines step size, typically order of 0.0018
- output_filename :file to write text on top of plaque, if one is found.
- host:Port :Host and port of the service to contact in the format localhost:9090
The parameter (x1,y1) should be lower coordinates than (x2, y2). This is the format gt4-pillar-finder uses to return values, so preserve the same order.
Sample Run
This section walks you through finding the first pillar, Pillar 0 and the text on top of the plaque on the pillar.
From the hints we use the approximate location for Pillar 0.
Try the following in your client window:
$ bin/gt4-pillar-finder 9447.5925 -445.8208 10 5 10000 localhost:9090
Possible pillar at [9453.167499999956,-440.1457999999993]
-[9454.517499999936,-438.795799999999]
The above gives you an approximate location of the pillar. Hints for other pillars might not be this accurate. Here are some suggestions on how you can change parameters:
- Increase/Descrease radius to change are that you are searching.
- Decrease step size to increase number of points searched in the given area. But this is also going to increase the computation time. So it might be more prudent to break down the area of search and keep the step size small.
- Decrease the number of sample to say 1000 and increase it gradually to see if any pillars are found. This might save computation time. But for most pillars 10000 would be sufficient.
You can use the visualizer client to locate the pillar before you use the pillar reader. But this is an optional step. The client used to visualize is called gt4-visualizer generates a GNU Plot of the surface points by contacting the Visualizer Srevice. The plot shows the result of a probe and could show the pillar and the position of the plaque. This plot can be used to narrow down the search for the plaque while using the pillar reader client.
$ bin/gt4-visualizer x1 y1 x2 y2 numberOfPoints hostPort plotFilename
- x1 : first x coordinate
- y1 : first y coordinate
- x2 : second x coordinate
- y2 : second y coordinate
- numberOfPoints: Number of points to probe and plot.This value should be lesser than or equal to the number of points allowed in a single probe. The maximum points is printed as output in the pillar-finder client.
- hostPort: host:Port where the service is running
- plotFilename : name of the file to write out plot to.
The (x1, y1) and (x2, y2) coordinates can be used from pillar-finder results.
$ bin/gt4-visualizer 9453.167499999956 -440.1457999999993
9454.517499999936 -438.795799999999 2000 localhost:9090 pillar0
File pillar0 (ps) format can be viewed to see where the plaque is and you can estimate the parameters for pillar reader. To view it you can use a postcriptviewer like Ghostscript (gs).
You can look at the graph to find the pillar and then zoom in. That would involve looking at the graph to determine a smaller area to look for the pillar. You can run the pillar-finder program with a smaller area and smaller sample size and run the visualizer again. This will help you narrow down search enough to run pillar finder with smaller sample size.
But this step is error prone since you are visually estimating it..
The pillar-reader helps read the plaque on the text. For tha above sample, the following run will read the data and store in file "pillar0Text".
$ bin/gt4-pillar-reader 9453.323793548387 -440.097064516129
9454.29153548387,-438.8067419354839  0.0015 pillar0Text localhost:9090
Start time is Wed Jul 05 18:52:15 CDT 2006
Count is 202499
End time is Wed Jul 05 18:55:29 CDT 2006
The text is placed in the file pillar0Text. View the contents of the file using the following:
$ tac pillar0Text
  ###    #      ###   ###   ##   #   ###
 #   #   #     #   #  #  #  ##   #  #   #
 #       #     #   #  #  #  ##   #  #
 #       #     #   #  ###   ##   #   ###
 #  ###  #     #   #  #  #  ##   #      #
 #   #   #     #   #  #  #  ##   #      #
 #   #   #     #   #  #  #  ##   #  #   #
  ###    ####   ###   ###     ###    ###
-
Other Pillars
There are ten more pillars that you can try and find. They are progressively more difficult to find.
Hints about these pillars are stored in an OGSA-DAI database and the following document describes how to get the data. Go to the OGSA-DAI Integrated practical page for information on retrieving the hints for the remaining pillars.
|
|