 |
|

|
| Prerequisites |
| A Simple Data Integration Scenario |
| The Client Toolkit - SQL Queries |
| The Client Toolkit - Processing Results |
| The Client Toolkit - SQL Updates |
Introduction
Welcome to the OGSA-DAI tutorial. This exercise will introduce you to using OGSA-DAI data services and provides a step-by-step guide to accessing OGSA-DAI services from a Java client. You can run through the exercises at your own pace. Solutions to the exercises are provided at the end of each paragraph.
Prerequisites
Download the OGSA-DAI WSRF 2.2 distribution and unpack it into a local directory on your machine.
$ mkdir /ogsadai/$USER/
$ cd /ogsadai/$USER/
$ wget http://www.gs.unina.it/~ogsadai/ogsadai-wsrf-2.2-bin.tar.gz
$ tar xzf ogsadai-wsrf-2.2-bin.tar.gz
Prepare the environment and classpath for running clients with the following commands:
$ cd ogsadai-wsrf-2.2
$ source setenv.sh
A Simple Data Integration Scenario
In this exercise you will use a graphical client to integrate data from two databases. The first database holds a simple addressbook, containing data such as name, address and phone numbers. The second database contains the date of birth. You will join the two tables to produce a list of people, their birthdays and their phone numbers so you can phone them on their birthday!
From the commandline, start the databrowser by typing:
$ ant databrowser
Once the databrowser has started up, connect to a data service by clicking on the Add Data Service... button. The data service is located at this URL:
http://ogsadai:8080/wsrf/services/ogsadai/DataService
If the data service URL is correct a list of available data resources should now be shown in the databrowser main window.
Select Join... from the Database menu. The following window will pop up.
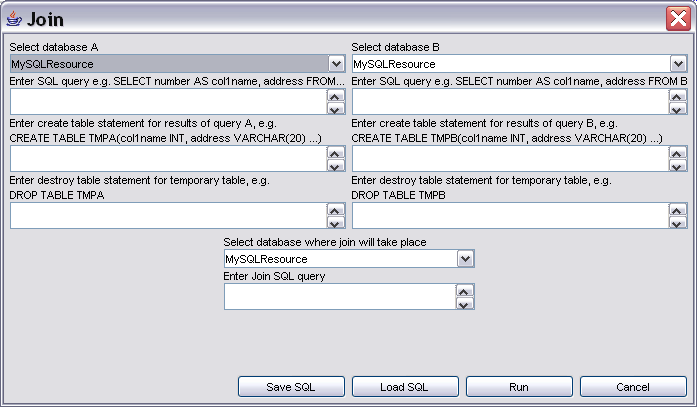
Select the AddressBook database for database A and Birthdays for database B. Then select a target database where the join will be performed (it doesn't matter which one).
Now you have to create two temporary tables into which the data will be selected. On database A, create the following temporary table with your user id in the table name:
CREATE TABLE tmpa-$USERNAME (id INTEGER, name VARCHAR(50), phone VARCHAR(20))
Make sure to replace "-$USERNAME" by your username, e.g. the table could be called tmpamy. On database B, create the following temporary table (again replace "-$USERNAME" by your username):
CREATE TABLE tmpb-$USERNAME (id INTEGER, dob DATE)
The destroy table statements for the temporary tables are:
DROP TABLE tmpa-$USERNAME
DROP TABLE tmpb-$USERNAME
The SQL query statement for database A is
SELECT (id, name, phone) FROM addressbook
The SQL query statement for database B is
SELECT (id, dob) FROM birthdays
Finally, the SQL statement which joins the two temporary tables is as follows:
SELECT name, phone, dob FROM tmpa, tmpb WHERE tmpa.id = tmpb.id
Now perform the join by clicking the OK button. You should see a list of rows that are the results from the above join.
The Client Toolkit
This section will show how to use the Client Toolkit to program a small Java application which connects to a data service.
SQL Queries
In this example, you will run a simple SQL query across a table called littleblackbook which looks like this:
| id | name | address | phone |
| 1 | Ally Antonioletti | 826 Hume Crescent, Southampton | 01670061244 |
| 2 | Amy Atkinson | 583 Atkinson Drive, Southampton | 06312054624 |
| 3 | Andrew Borley | 354 Jackson Road, Edinburgh | 01057075166 |
| 4 | Charaka Chue Hong | 750 Pearson Crescent, Southampton | 09945916393 |
| 5 | Dave Hardman | 079 Borley Gardens, Winchester | 06725558505 |
| ... | ... | ... | ... |
For example, the following SQL statement selects one row from the table littleblackbook:
select * from littleblackbook where id='3475'
and returns the following:
| 3475 | James Antonioletti | 163 Palansuriya Avenue, Winchester | 008979852295 |
Implementation
The following steps show you how to write a Java client that contacts a data service, queries the database and prints out the results.
Create a new directory named client for your example code.
$ mkdir client
$ cd client
Within this directory, create a new Java class with a main method, called SimpleClient.java, for example. The class resides in the package client. This class has to import the following client toolkit classes:
import uk.org.ogsadai.client.toolkit.GenericServiceFetcher;
import uk.org.ogsadai.client.toolkit.Response;
import uk.org.ogsadai.client.toolkit.activity.ActivityRequest;
import uk.org.ogsadai.client.toolkit.activity.sql.SQLQuery;
import uk.org.ogsadai.client.toolkit.activity.sql.WebRowSet;
import uk.org.ogsadai.client.toolkit.service.DataService;
A skeleton file is provided here: SimpleClient.java.
Before you can access the database you must connect to the Data Service with a given URL. Use the uk.org.ogsadai.client.toolkit.GenericServiceFetcher to get a data service:
String handle = "http://ogsadai:8080/wsrf/services/ogsadai/DataService";
String id = "MySQLResource";
DataService service = GenericServiceFetcher.getInstance().getDataService(handle, id);
Now construct a new SQLQuery object from your SQL query string.
SQLQuery query = new SQLQuery("select * from littleblackbook where id='3475'");
Then choose an output format for your query so it can be delivered in the response. An SQLQuery returns an internal binary format which can be processed by other activities but cannot be included in a SOAP message. We will use a WebRowSet format which is an XML representation of a JDBC ResultSet object. Another text format suitable for delivery in the response is CSV (comma-separated values).
WebRowSet rowset = new WebRowSet(query.getOutput());
Create a request which holds both the query and the conversion ...
ActivityRequest request = new ActivityRequest();
request.add(query);
request.add(rowset);
... execute the request ...
Response response = service.perform(request);
... and have a look at the results!
System.out.println(response.getAsString());
Now compile and run your client code. First, change back into the root directory of your OGSA-DAI installation.
$ cd ..
$ javac client/SimpleClient.java
$ java client.SimpleClient
The results contain a status message from each activity that has been processed and any data that may have been produced. If your query was successful all activities report that they have COMPLETED. The WebRowSet activity result contains the SQL query results in a WebRowSet format. A WebRowSet document is a XML representation of a SQL RowSet and consists of a properties section, a metadata section and a data section. The metadata gives information about the columns in the result set. The actual data is contained within the data element. Here's what your query should return:
<?xml version="1.0" encoding="UTF-8"?>
<ns1:response xmlns:ns1="http://ogsadai.org.uk/namespaces/2005/10/types">
    <ns1:request status="COMPLETED"/>
    <ns1:result name="SQLQuery-ogsadai-104efff5bd7" status="COMPLETED"/>
    <ns1:result name="ogsadai-104efff5bd8" status="COMPLETED"><![CDATA[<?xml version="1.0" encoding="UTF-8"?>
<webRowSet xmlns="http://java.sun.com/xml/ns/jdbc" xmlns:xsi="http://www.w3.org/2001/XMLSchema-instance"
xsi:schemaLocation="http://java.sun.com/xml/ns/jdbc http://java.sun.com/xml/ns/jdbc/webrowset.xsd">
 <properties>
  . . .
 </properties>
 <metadata>
  <column-count>4</column-count>
  <column-definition>
   . . .
 </metadata>
 <data>
  <currentRow>
   <columnValue>3475</columnValue>
   <columnValue>James Antonioletti</columnValue>
   <columnValue>163 Palansuriya Avenue, Winchester</columnValue>
   <columnValue>00897985229</columnValue>
  </currentRow>
 </data>
</webRowSet>]]></ns1:result>
</ns1:response>
The complete example code is available here: SimpleClient.java
Processing Results
There are basically two ways of formatting the output of an SQLQuery activity: You can retrieve the data as a string (which is encoded as a XML document conforming to the WebRowSet schema) or as a JDBC ResultSet. You have seen how to get the complete response document as a String in the previous example.
To retrieve the output from the query you have run above you have to go back to your Activity object and obtain an ActivityOutput object:
ActivityOutput output = rowset.getOutput();
Now you can retrieve the data from the output, for example as a JDBC ResultSet object:
ResultSet resultset = rowset.getResultSet();
This allows for further processing of the results using JDBC. For example, scrolling through the rows of the result set and retrieving the column values as the appropriate types:
while (resultset.next()) {
    int col1 = resultset.getInt(1);
    String col2 = resultset.getString(2);
    String col3 = resultset.getString(3);
    String col4 = resultset.getString(4);
}
By default, the ResultSet object will be of type ResultSet.TYPE_FORWARD_ONLY which means that it can only be scrolled through once, from the first row to the last row. If you would like more flexible access to the results, for example for use in an interactive application, this can be achieved by using the setResultSetType(int) method on the WebRowSet object before calling getResultSet().
Warning: Setting the result set type to ResultSet.TYPE_SCROLL_INSENSITIVE causes the entire result set to be held in memory, so should be used with caution when dealing with very large result sets.
The complete example code is available here: ProcessingSQLQueryResults.java
SQL Updates
When updating a relational database you must use the SQLUpdate activity object. You can pass in parameters or pull the the update data from another location.
Create an SQLUpdate object from an SQL update string. For example, you can insert a new row into table littleblackbook.
String sql_insert =
  "insert into littleblackbook values (10010,'Jimbo Goggins','Buckingham Palace','0123456789')";
SQLUpdate update = new SQLUpdate( sql_insert );
Perform the update.
service.perform(update);
The number of modified rows, as returned by the database, can be retrieved from the SQLUpdate object.
int updateCount = update.getModifiedRowsCount();
Similarly, you can update or delete rows in your table:
String sql_update = "update littleblackbook set address = '13 Cod Road' where id = 10010";
String sql_delete = "delete from littleblackbook where id = 10010";
As for SQL queries, you can set parameters with setParameter.
String sql = "update littleblackbook set address = ? where id = ?";
SQLUpdate update = new SQLUpdate( sql );
update.setParameter(1, "35 Coronation Street, Manchester");
update.setParameter(2, "10010");
Creating and dropping tables are also update operations. For example, the following SQL statement creates an empty table similar to the littleblackbook table.
create table mytable (id INTEGER, name VARCHAR(64), address VARCHAR(128), phone VARCHAR(20))
Use this SQL statement to create a new table. You can drop the table like this:
drop table mytable
The complete example code is available here: SQLUpdateExample.java
Advanced Exercises
If you have finished the introductory practical and would like to learn more please move on to the advanced practical. Skills acquired in the advanced practical can be applied to the final integrating practical.
|
|