 |
|
 |
| |
| Main Page |
| How to write a JDL file |
| Essential JDL attributes |
| Exercise 1 |
| Exercise 2 |
Job Description Language (JDL)
How to write a JDL fileIn gLite, job description files (.jdl files) are used to describe jobs for execution on Grid. These files are written using the Job Description Language (JDL). The JDL adopted within gLite is based on the Classified Advertisement (ClassAd) language created by the Condor Project, which deals with the management of distributed computing environments, and whose central construct is the ClassAd, a record-like structure composed of a finite number of distinct attribute names mapped to expressions. A ClassAd is a highly flexible and extensible data model that can be used to represent arbitrary services and constraints on their allocation.
The JDL is used in gLite to specify the desired job characteristics and constraints, which are used by the match-making process to select the resources that the job will use.
The fundamentals of the JDL are given in this section.
The JDL syntax consists of statements ending with a semicolon, like:
attribute = value;
Literal strings (for values) are enclosed in double quotes. If a string itself contains double quotes, they must be escaped with a backslash:
Arguments = " \"hello\" 10";
For special characters, such as &, the shell on the WN will itself expect the escaped form: \&, and therefore both the slash and the ampersand will have to be escaped inside the JDL file, resulting in:
$\\\&
In general, special characters such as &, |, >, <
are only allowed if specified inside a quoted string or preceded by
triple \. The character `` ` '' cannot be specified in the JDL.
Comments must be preceded by a sharp character (#) or have to follow
the C++ syntax, i.e a double slash (//) at the beginning of each line
or statements begun/ended respectively with /* and */ .
The JDL is sensitive to blank characters and tabs. No blank characters or tabs should follow the semicolon at the end of a line.
Essential JDL attributes.![]()
In a job description file, some attributes are mandatory,
while some others are optional.
Essentially, one must at least specify the name of the executable, the
files where to write the standard output and the standard error of the
job (they can even be the same file), for the standard input, an input
file can be similarly specified.
For example:
Executable = "test.sh";
StdOutput = "std.out";
StdError = "std.err";
StdInput = "std.in";
Standard output, standard error, and stardard input are
redirected to the files std.out, std.err and std.in, respectively,
which are then transferred back to the User Interface after the job has
finished, as they are in the Output Sandbox.
If needed, arguments to the executable can be passed:
Arguments = "hello 10";
Then, the files to be transferred between the UI and the WN before (Input Sandbox) and after (Output Sandbox) the job execution can be specified:
InputSandbox = {"test.sh","std.in"};
OutputSandbox = {"std.out","std.err"};
In this example, the executable test.sh is
also transferred. This would not be necessary if that file was already
in the Worker Node (or, for example, it was a common Unix command, such
as /bin/hostname).
Wildcards are allowed only in the InputSandbox attribute. The list of
files in the Input Sandbox is specified relatively to the current
working directory.
Absolute paths cannot be specified in the OutputSandbox attribute.
Neither the InputSandbox nor the OutputSandbox lists can contain two
files with the same name (even if in different paths) as when
transferred they would overwrite each other.
Note: The executable flag is not preserved
for the files included in the Input Sandbox when transferred to the WN.
Therefore, for any file needing execution permissions a chmod +x
operation should be performed by the initial script specified as the
Executable in the JDL file (the chmod +x operation is done
automatically for this script).
The environment of the job can be modified using the
Environment attribute.
For example:
Environment = {"CLASSPATH=./myappl.jar",
               "LCG_GFAL_VO=gilda"};
Some JDL attributes allow the user to specify requirements.
The Requirements attribute can be used to express any kind of
constraint on the resources where the job can run. Its value is a
Boolean expression that must evaluate to true for a job to run on that
specific CE. For that purpose all the GLUE attributes of the IS can be
used.
Specifying requirements on the CE:
The Workload Management System can be also asked to send a job to a
particular CE with the following expression:
Requirements = other.GlueCEUniqueID == "grid010.ct.infn.it:2119/jobmanager-pbs-short";
where the other. is a prefix used to indicate that the GlueCEUniqueID attribute refers to the GlueSchema CE characteristics.
If the job must run on a CE where a particular experiment software is installed and this information is published by the CE, something like the following must be written:
Requirements = Member("ALICE-4.01.00",other.GlueHostApplicationSoftwareRunTimeEnvironment);
The choice of the CE where to execute the job, among all the
ones satisfying the requirements, is based on the rank of the CE;
namely, a quantity expressed as a floating-point number. The CE with
the highest rank is the one selected.
The user can define the rank with the Rank attribute as a function of
the CE attributes.
The default definition takes into account the number of CPUs in the CPU
that are free:
Rank = other.GlueCEStateFreeCPUs;
but more complex expression are possible.
gLite Job Management Commands
To submit a job to the gLite Grid, the user must have a valid proxy certificate in the User Interface machine (as described in Security Concept) and use the following command:
$ glite-job-submit jdlfile
where jdlfile is a file containing the job description with
extension .jdl.
The command returns to the user the job identifier (jobId),
which defines uniquely the job and can be used to perform further
operations on the job, like interrogating the system about its status,
or canceling it. The format of the jobId is:
https://Lbserver_address[:port]/unique_string
The useful -o <file_path> option
allows users to specify a file to which the jobId of the submitted job
will be appended. This file can be given to other job management
commands to perform operations on more than one job with a single
command.
If the submission is successful, the output is similar to:
$ glite-job-submit -o ID myappl.jdl

Selected Virtual Organisation name (from proxy certificate extension): gilda
Connecting to host glite-rb.ct.infn.it, port 7772
Logging to host glite-rb.ct.infn.it, port 9002

================================ glite-job-submit Success =====================================
 The job has been successfully submitted to the Network Server.
 Use glite-job-status command to check job current status. Your job identifier is:

 - https://glite-rb.ct.infn.it:9000/4_jkRmHq6B5nv8eij4xs7g

 The job identifier has been saved in the following file:
 /net/users/vardizzo/ID
=============================================================================================
How to query Job status![]()
After a job is submitted, it is possible to inspect its status, along with the time when that status was reached, and the reason for being in that state. The option -i _file path_ can be used to specify a file with a list of job identifiers (saved previously with the -o option of glite-job-submit). In this case, the command asks the user interactively the status of which job(s) should be printed. Subsets of jobs can be selected (e.g. 1-2,4).
The command to use is:
$ glite-job-status -i ID

------------------------------------------------------------------
1 : https://dualxeon.gs.unina.it:9000/HalXorxZ0gTr4WDMloaZ0A
2 : https://glite-rb.ct.infn.it:9000/4_jkRmHq6B5nv8eij4xs7g
a : all
q : quit
------------------------------------------------------------------

Choose one or more jobId(s) in the list - [1-2]all:2

*************************************************************
BOOKKEEPING INFORMATION:

Status info for the Job : https://glite-rb.ct.infn.it:9000/4_jkRmHq6B5nv8eij4xs7g
Current Status:     Done (Success)
Exit code:          0
Status Reason:      Job terminated successfully
Destination:        grid-ce.bio.dist.unige.it:2119/jobmanager-lcgpbs-long
Submitted:          Sat Jun 15 20:19:21 2006 CEST
*************************************************************
In the following examples, the first command retrieves all jobs of the user that are in the state DONE or RUNNING, and the second retrieves all jobs that were submitted before the 17:35 of the current day, and that were not in the CLEARED state.
$ glite-job-status --all -s DONE -s RUNNING
$ glite-job-status --all -e CLEARED --to 17:35
How to retrieve Job output![]()
After the job has finished (it reaches the DONE status), its output can be copied to the UI with the following command, which takes a list of jobs as argument.
$ glite-job-output -i ID

------------------------------------------------------------------
1 : https://dualxeon.gs.unina.it:9000/HalXorxZ0gTr4WDMloaZ0A
2 : https://glite-rb.ct.infn.it:9000/4_jkRmHq6B5nv8eij4xs7g
a : all
q : quit
------------------------------------------------------------------

Choose one or more jobId(s) in the list - [1-2]all:2


Retrieving files from host: glite-rb.ct.infn.it
( for https://glite-rb.ct.infn.it:9000/4_jkRmHq6B5nv8eij4xs7g )

*********************************************************************************
                        JOB GET OUTPUT OUTCOME

 Output sandbox files for the job:
 - https://glite-rb.ct.infn.it:9000/4_jkRmHq6B5nv8eij4xs7g
 have been successfully retrieved and stored in the directory:
 /tmp/vardizzo_4_jkRmHq6B5nv8eij4xs7g

*********************************************************************************
By default, the output is stored under /tmp, but it is possible to specify in which directory to save the output using the - -dir <path_name_ option>.
$ cat /tmp/vardizzo_4_jkRmHq6B5nv8eij4xs7g/std.out

Hello Valeria_!
Welcome to  International Summer School on Grid Computing, Ischia 09h-21th July - 2006
How to cancel a Job
submitted![]()
A job can be canceled before it ends using the following
command that requires as arguments one or more job identifiers.
If the job has not reached the CE yet (i.e.: its status is WAITING or
READY states), the cancellation request may be ignored, and the job may
continue running, although a message of successful cancellation is
returned to the user. In such cases, just cancel the job again when its
status is SCHEDULED or RUNNING.
$ glite-job-cancel -i ID

------------------------------------------------------------------
1 : https://dualxeon.gs.unina.it:9000/HalXorxZ0gTr4WDMloaZ0A
2 : https://glite-rb.ct.infn.it:9000/8QA-W2v5p0_spBtBYx6HOg
3 : https://glite-rb.ct.infn.it:9000/FQ1HARzcnKXZDyl_TunkmQ
a : all
q : quit
------------------------------------------------------------------

Choose one or more jobId(s) in the list - [1-3]all:3


Are you sure you want to remove specified job(s)? [y/n]n :y

=============================  glite-job-cancel Success  ==============================
 The cancellation request has been successfully submitted for the following job(s):

 - https://glite-rb.ct.infn.it:9000/FQ1HARzcnKXZDyl_TunkmQ

=====================================================================================
![]()
How to list the suitable
CEs for a Job![]()
It is possible to see which CEs satisfy your job's requirements using the following command:
$ glite-job-list-match myappl.jdl

Selected Virtual Organisation name (from proxy certificate extension): gilda
Connecting to host glite-rb.ct.infn.it, port 7772

***************************************************************************
                         COMPUTING ELEMENT IDs LIST
 The following CE(s) matching your job requirements have been found:

                   *CEId*
 gildace.oact.inaf.it:2119/jobmanager-lcgpbs-infinite
 gildace.oact.inaf.it:2119/jobmanager-lcgpbs-long
 gildace.oact.inaf.it:2119/jobmanager-lcgpbs-short
 grid-ce.bio.dist.unige.it:2119/jobmanager-lcgpbs-infinite
 grid-ce.bio.dist.unige.it:2119/jobmanager-lcgpbs-long
 grid-ce.bio.dist.unige.it:2119/jobmanager-lcgpbs-short
 grid010.ct.infn.it:2119/jobmanager-lcgpbs-infinite
 grid010.ct.infn.it:2119/jobmanager-lcgpbs-long
 grid010.ct.infn.it:2119/jobmanager-lcgpbs-short
 grid011f.cnaf.infn.it:2119/jobmanager-lcgpbs-infinite
 grid011f.cnaf.infn.it:2119/jobmanager-lcgpbs-long
 grid011f.cnaf.infn.it:2119/jobmanager-lcgpbs-short
 trigrid-ce00.unime.it:2119/jobmanager-lcgpbs-infinite
 trigrid-ce00.unime.it:2119/jobmanager-lcgpbs-long
 trigrid-ce00.unime.it:2119/jobmanager-lcgpbs-short
***************************************************************************
Exercises
Exercise 1![]()
This exercise allows user to submit a simple job. This job run an hostname command and print the hostname of worknode that ran the job.
Be sure to have a valid proxy with VOMS extensions before to start the exercise (use voms-proxy-init --voms gilda to achieve that)
Step 1: Create a file named hostname.jdl with this content:
Type = "Job";
JobType = "Normal";
Executable = "/bin/hostname";
StdOutput = "hostname.out";
StdError = "hostname.err";
OutputSandbox = {"hostname.err","hostname.out"};
Arguments = "-f";
Step 2: Submit the job with the glite-job-submit command:
$ glite-job-submit -o jobid.txt hostname.jdl

Selected Virtual Organisation name (from proxy certificate extension): gilda
Connecting to host glite-rb.ct.infn.it, port 7772
Logging to host glite-rb.ct.infn.it, port 9002

================================ glite-job-submit Success =====================================
 The job has been successfully submitted to the Network Server.
 Use glite-job-status command to check job current status. Your job identifier is:

 - https://glite-rb.ct.infn.it:9000/_rBCis_B0swHdZ4OW_JrXg

 The job identifier has been saved in the following file:
 /home/scardaci/gLite/Other/jobid.txt
=============================================================================================
Step 3: Monitor the job until its status is DONE using the glite-job-status command:
 $ glite-job-status -i jobid.txt


*************************************************************
BOOKKEEPING INFORMATION:

Status info for the Job : https://glite-rb.ct.infn.it:9000/_rBCis_B0swHdZ4OW_JrXg
Current Status:     Done (Success)
Exit code:          0
Status Reason:      Job terminated successfully
Destination:        grid011f.cnaf.infn.it:2119/jobmanager-lcgpbs-infinite
Submitted:          Sun Jul 16 17:26:04 2006 CEST
*************************************************************
Step 4: Retrieve the job output with the glite-job-output command:
$ glite-job-output -i jobid.txt

Retrieving files from host: glite-rb.ct.infn.it
( for https://glite-rb.ct.infn.it:9000/_rBCis_B0swHdZ4OW_JrXg )

*********************************************************************************
                        JOB GET OUTPUT OUTCOME

 Output sandbox files for the job:
 - https://glite-rb.ct.infn.it:9000/_rBCis_B0swHdZ4OW_JrXg
 have been successfully retrieved and stored in the directory:
 /tmp/glite/glite-ui/scardaci__rBCis_B0swHdZ4OW_JrXg

*********************************************************************************
Step 5: Take a look at the job output:
$ cd /tmp/glite/glite-ui/scardaci__rBCis_B0swHdZ4OW_JrXg

$ ls
hostname.err  hostname.out

$ cat hostname.out
egee011.cnaf.infn.it
With this exercise, you will gain
some
experience with submitting a real Java program similar to the one that
you'll use for the gLite integrating exercise next Thursday
(assuming you choose the gLite path).
The application is a very simple one. Imagine a three-dimensional
surface or topographical map. You can discover the features of this
map with an application that samples the surface at different points,
and then you can visualize the data that it provides. The process to
examine the data and create the map is very fast, but it's similar in
operation to a real application, which would usually be much slower.
The two-dimensional surface is located between (-100,-100) and
(100,100). We can visualize a subset of the surface by specifying the
subset we want and the number of points we use in the
visualization. These numbers must be given as input parameters to the
RegularExplorer class. The class output can be visualized using gnuplot.
Step 1: download the IntroExercise.tar archive and extract all its content:
$ tar xvf IntroExercise.tar
ShapesData.tar.gz
explorer.jar
Step 2: create a script file named explorer.sh:
#!/bin/sh
###Script to run RegularExplorer
echo "###################  START   ####################"

mkdir ShapesData
tar xvfz ShapesData.tar.gz
mv *.txt ShapesData

echo "####  ARGUMENTS  ####"
LX="${1}";
LY="${2}";
UX="${3}";
UY="${4}";
COUNT="${5}";
OUT="${6}"

echo "Usage:RegularExplorer ${LX} ${LY} ${UX} ${UY} ${COUNT} ${OUT}"
echo "####  END ARGUMENTS  ####"


#echo "####  JAVA COMMAND  ####"
chmod 555 explorer.jar

if [ "$JAVA_HOME" != "" ]
then
   JAVA_EXE=$JAVA_HOME/bin/java
else
   JAVA_EXE=java
fi

CLASS_EXE=uk.ac.nesc.training.sfk.RegularExplorer

echo "$JAVA_EXE -Xms512m -Xmx512m $CLASS_EXE ${LX} ${LY} ${UX} ${UY} ${COUNT} ${OUT}"
$JAVA_EXE -Xms512m -Xmx512m $CLASS_EXE ${LX} ${LY} ${UX} ${UY} ${COUNT} ${OUT}

echo "####  END JAVA COMMAND  ####"

echo "...RegularExplorer ended."
This script is used to lauch the RegularExplorer class once the job reaches the WN. -Xms and -Xmx flags are used to increment the heap size allocated to java apps in case you want to sample a pretty big surface.
Step 3: write the following explorer.jdl file:
Type = "Job";
JobType = "Normal";
Executable = "/bin/sh";
Environment = {"CLASSPATH=./explorer.jar"};
Arguments = " explorer.sh 0 0 10 10 2000 out.dat";
StdOutput = "explorer.out";
StdError = "explorer.err";
InputSandbox = {"explorer.sh","explorer.jar","ShapesData.tar.gz"};
OutputSandbox = {"explorer.err","explorer.out","out.dat"};
Requirements = Member("GLITE-3_0_0",other.GlueHostApplicationSoftwareRunTimeEnvironment);
With the specified arguments, we are trying to sample the surface that has left lower corner at (0,0) and left upper corner at (10,10), using 2000 samples. The sample data generated will be saved in the out.dat file.
Step 4: Submit the job explorer.jdl using the gLite commands illustrated above.
$ glite-job-submit -o jodid.txt explorer.jdl


Selected Virtual Organisation name (from proxy certificate extension): gilda
Connecting to host glite-rb.ct.infn.it, port 7772
Logging to host glite-rb.ct.infn.it, port 9002

================================ glite-job-submit Success =====================================
 The job has been successfully submitted to the Network Server.
 Use glite-job-status command to check job current status. Your job identifier is:

 - https://glite-rb.ct.infn.it:9000/eyBCUsI77ek-Aet7mquFDg

 The job identifier has been saved in the following file:
 /home/scardaci/IntroExercise/jobid.txt
=============================================================================================
If you don't remember commands for job handling (submission, monitoring status, retrieve output when the job is done) please refer to gLite Job Management Commands
Step 5: Take a look to the file out.dat returned by the job using gnuplot to visualize the tridimensional surface.
> > gnuplot

        G N U P L O T
        Version 3.7 patchlevel 3
        last modified Thu Dec 12 13:00:00 GMT 2002
        System: Linux 2.4.21-27.0.2.EL.cernsmp

        Copyright(C) 1986 - 1993, 1998 - 2002
        Thomas Williams, Colin Kelley and many others

        Type `help` to access the on-line reference manual
        The gnuplot FAQ is available from
        http://www.gnuplot.info/gnuplot-faq.html

        Send comments and requests for help to
        Send bugs, suggestions and mods to


Terminal type set to 'x11'
gnuplot> splot "out.dat"
Warning: empty z range [41.2:41.2], adjusting to [40.788:41.612]
gnuplot>
It should pop up an image like this:
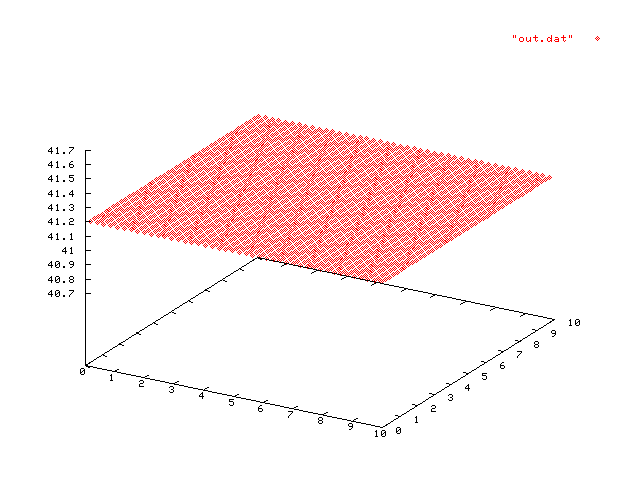
Probably you will not see any amazing part of the surface in (0,0)-(10,10)! In the next exercise, you will learn how to submit a bunch of RegularExplorer jobs giving as input several arguments in such a way to find out the simple objects spread along the surface.
| |
|